Introduction
OpenShift 4 can be deployed across various platforms using the Installer Provisioned Infrastructure (IPI) or User Provisioned Infrastructure (UPI) methods. This guide focuses on setting up an OpenShift 4 BareMetal UPI cluster on AWS, which provides more control over the infrastructure, making it suitable for customized and complex deployments. While the AWS IPI method is typically the first choice, certain use cases necessitate using the BareMetal UPI method. This guide will walk you through the steps to create the AWS infrastructure from scratch and deploy OpenShift nodes using this method. The various platforms list can be found on the provided documentation link.
What will be covered in this post?
Setting up AWS Infra in terms of Virtual Private Cloud, Network Load Balancer, Route53, OpenShift 4 nodes, etc with the help of AWS CloudFormation templates which can be downloaded from the GitHub link below.
Why Choose BareMetal UPI on AWS?
This question is valid and AWS IPI should be the first option always but there are some use-cases that require to create the cluster with BareMetal UPI method, some of them are listed below.
Full Control Over AWS Resources
The BareMetal UPI method offers complete control over AWS resources, allowing you to design and manage the architecture according to specific requirements. This is crucial when you need to fine-tune security, networking, and other settings.
Custom Architecture Design
With the UPI method, you can design the architecture to meet your exact needs. Whether it’s customizing subnet structures, VPCs, or security groups, UPI provides the flexibility that IPI does not.
Enhanced Security Management
By using the BareMetal UPI method, you avoid giving OpenShift cluster access to your AWS account. This method allows you to manage security group rules, load balancers, and VPC settings directly, ensuring that your security posture aligns with your organization’s standards.
Advanced Networking Capabilities
For complex networking scenarios, such as advanced VPC networking, the UPI method is ideal. You can configure private and public subnets, NAT gateways, and route tables to meet specific networking requirements.
Architecture Overview

The architecture for the OpenShift 4 BareMetal UPI cluster on AWS consists of a Virtual Private Cloud (VPC) with six subnets: three public and three private. The public subnets share a single route table with a default route to the Internet Gateway, providing internet connectivity. Each private subnet has its own route table, with routes pointing to respective NAT gateways located in the public subnets. This setup allows EC2 instances in private subnets to access external services, such as pulling container images, while remaining isolated from external access. Additionally, an S3 endpoint is created to provide private connectivity to S3 buckets, enabling the fetching of ignition configurations for the cluster. Route53 DNS records for accessing the OCP API and routes along with the S3 bucket for hosting ignition file also provisions.
The following AWS resources are created during the installation:
- VPC
- Internet Gateway
- S3 Endpoint
- 6 Subnets (3 Public, 3 Private)
- 3 NAT Gateways
- 4 Route Tables (1 for Public Subnets, 3 for Private Subnets)
- Route53 Private Hosted Zone
- DNS Records for Cluster Communication
- Network Load Balancer
- Listeners
- 6443/TCP API
- 22623/TCP machine-config-server
- 443/TCP Ingress
- 80/TCP Ingress
- Listeners
- Target Groups
- 6443/TCP API
- 22623/TCP machine-config-server
- 443/TCP Ingress
- 80/TCP Ingress
- Security Group
- EC2 Instances: Bastion Node, Bootstrap Node, 3 Master Nodes, 2 Worker Nodes
Information Handy
Before starting the installation, ensure that you have the following details and resources ready:
- Bastion Node AMI IDs for all regions
- OCP 4 Binaries Download Link for all versions
- Sample install-config.yaml file for BareMetal cluster
- Red Hat Enterprise Linux CoreOS (RHCOS) AMI IDs for all AWS regions
- Security Group Inbound rules detail
- OpenShift Pull Secret
- S3 Bucket Name \\ Any preferred name
- Private Domain \\ Any preferred domain name
- Cluster Name \\ Can be any name of your choice
- ResourcePrefix \\ Specific string to prefix with AWS resource name
Parameters and values used in this post
- Bastion Node AMI ID: ami-0ff8a91507f77f867
- OCP 4 Binary Links:
- Sample install-config.yaml file: Sample install-config.yaml file for bare metal
- RHCOS 4.16 AMI ID for us-east-1 Region: ami-05483066c3caaccf5
- Security Group Inbound Rules: SecurityGroupIngress
- Allow traffic on port 22/TCP from everywhere
- Allow traffic for all ports and protocols from VPC CIDR only
- S3 Bucket Name: ayush-baremetal-upi
- Private Domain: ayush.com
- Cluster Name: ocp-bm-upi
- ResourcePrefix: ayush-baremetal-upi
Let’s Start the Installation!
AWS Infrastructure Setup
- Start by cloning the OpenShift4-AWS-BareMetal-UPI GitHub repository to your local machine.

$ git clone https://github.com/ay-garg/OpenShift4-AWS-BareMetal-UPI.gitCloning into 'OpenShift4-AWS-BareMetal-UPI'...remote: Enumerating objects: 9, done.remote: Counting objects: 100% (9/9), done.remote: Compressing objects: 100% (8/8), done.remote: Total 9 (delta 3), reused 0 (delta 0), pack-reused 0Receiving objects: 100% (9/9), 4.72 KiB | 4.72 MiB/s, done.Resolving deltas: 100% (3/3), done.$ ls -l OpenShift4-AWS-BareMetal-UPI/total 64-rw-r--r-- 1 ayush staff 12509 Aug 10 12:46 AWS-Infra-CloudFormation-Template.yaml-rw-r--r-- 1 ayush staff 1545 Aug 10 12:46 Bootstrap-Instance.yaml-rw-r--r-- 1 ayush staff 2687 Aug 10 12:46 Master-Instance.yaml-rw-r--r-- 1 ayush staff 107 Aug 10 12:46 README.md-rw-r--r-- 1 ayush staff 2122 Aug 10 12:46 Worker-Instance.yaml
- Use the AWS-Infra-CloudFormation-Template.yaml file to create a new CloudFormation stack. This stack will provision the necessary AWS infrastructure, including VPC, subnets, NAT gateways, and route tables.

- Specify the correct values for the required parameters.
If you are confused about what values should be specified, you can refer to the Information Handy section.

- Once the stack creation is initiated, monitor the progress. After completion, the resource IDs will be available in the Outputs tab of the CloudFormation stack.


- Multiple resources get created by this CloudFormation stack as shown below.


- Navigate to the S3 service, locate the newly created S3 bucket, and adjust the settings to make it publicly accessible. Ensure that ACLs are enabled.


Bootstrap Node Creation
- Access the bastion node via SSH and download the OpenShift binaries for creating ignition files.
Correct pull secret must be specified in install-config.yaml file which can be obtained from the Red Hat website link mentioned in the Information Handy section. The SSH key-pair is generated in this step and the public key detail should be specified in the install-config.yaml file.
// SSH to bastion node.$ ssh ec2-user@44.201.122.240 -i ayush-m1-air.pemThe authenticity of host '44.201.122.240 (44.201.122.240)' can't be established.ED25519 key fingerprint is SHA256:TUDrGQwbzJ43L0subnad2kCgFskJLU/sYQyfdtzMEnA.This key is not known by any other names.Are you sure you want to continue connecting (yes/no/[fingerprint])? yesWarning: Permanently added '44.201.122.240' (ED25519) to the list of known hosts.ec2-user@ip-10-0-1-251:~ __| __|_ ) _| ( / Amazon Linux AMI ___|\___|___|https://aws.amazon.com/amazon-linux-ami/2018.03-release-notes/35 package(s) needed for security, out of 59 availableRun "sudo yum update" to apply all updates.// Download the oc binary TAR.ec2-user Sun Aug 11 2024 ip-10-0-1-251 ec2-user@ip-10-0-1-251 ~$ wget -c https://mirror.openshift.com/pub/openshift-v4/x86_64/clients/ocp/4.16.5/openshift-client-linux-amd64-rhel8-4.16.5.tar.gz--2024-08-10 19:01:18-- https://mirror.openshift.com/pub/openshift-v4/x86_64/clients/ocp/4.16.5/openshift-client-linux-amd64-rhel8-4.16.5.tar.gzResolving mirror.openshift.com (mirror.openshift.com)... 18.67.76.98, 18.67.76.55, 18.67.76.76, ...Connecting to mirror.openshift.com (mirror.openshift.com)|18.67.76.98|:443... connected.HTTP request sent, awaiting response... 200 OKLength: 66676058 (64M) [application/x-tar]Saving to: 'openshift-client-linux-amd64-rhel8-4.16.5.tar.gz'openshift-client-linux-amd64-rhel8-4.16.5.tar.gz 100%[======================================================================================================================================>] 63.59M 26.8MB/s in 2.4s2024-08-10 19:01:21 (26.8 MB/s) - 'openshift-client-linux-amd64-rhel8-4.16.5.tar.gz' saved [66676058/66676058]// Exctract the oc binary TAR and move it to /usr/local/bin.ec2-user Sun Aug 11 2024 ip-10-0-1-251 ec2-user@ip-10-0-1-251 ~$ tar -xf openshift-client-linux-amd64-rhel8-4.16.5.tar.gz && rm -rf openshift-client-linux-amd64-rhel8-4.16.5.tar.gz README.md kubectl && sudo mv oc /usr/local/bin/// Execute the "oc version" command to verify the binary.ec2-user Sun Aug 11 2024 ip-10-0-1-251 ec2-user@ip-10-0-1-251 ~$ oc versionClient Version: 4.16.5Kustomize Version: v5.0.4-0.20230601165947-6ce0bf390ce3// Download openshift-install binary TAR.ec2-user Sun Aug 11 2024 ip-10-0-1-251 ec2-user@ip-10-0-1-251 ~$ wget -c https://mirror.openshift.com/pub/openshift-v4/x86_64/clients/ocp/4.16.5/openshift-install-linux-4.16.5.tar.gz--2024-08-10 19:02:45-- https://mirror.openshift.com/pub/openshift-v4/x86_64/clients/ocp/4.16.5/openshift-install-linux-4.16.5.tar.gzResolving mirror.openshift.com (mirror.openshift.com)... 18.67.76.55, 18.67.76.28, 18.67.76.98, ...Connecting to mirror.openshift.com (mirror.openshift.com)|18.67.76.55|:443... connected.HTTP request sent, awaiting response... 200 OKLength: 510259740 (487M) [application/x-tar]Saving to: 'openshift-install-linux-4.16.5.tar.gz'openshift-install-linux-4.16.5.tar.gz 100%[======================================================================================================================================>] 486.62M 23.6MB/s in 21s2024-08-10 19:03:07 (22.8 MB/s) - 'openshift-install-linux-4.16.5.tar.gz' saved [510259740/510259740]// Exctract the oc binary TAR.ec2-user Sun Aug 11 2024 ip-10-0-1-251 ec2-user@ip-10-0-1-251 ~$ tar -xf openshift-install-linux-4.16.5.tar.gz && rm -rf README.md openshift-install-linux-4.16.5.tar.gz// Execute "./openshift-install version" command to verify binary.ec2-user Sun Aug 11 2024 ip-10-0-1-251 ec2-user@ip-10-0-1-251 ~$ ./openshift-install version./openshift-install 4.16.5built from commit 38d2f1de5d5a03aafb7419f587b0a241de1e3ae0release image quay.io/openshift-release-dev/ocp-release@sha256:ac78ebf77f95ab8ff52847ecd22592b545415e1ff6c7ff7f66bf81f158ae4f5erelease architecture amd64// Generate SSH key-pair.ec2-user Sun Aug 11 2024 ip-10-0-1-251 ec2-user@ip-10-0-1-251 ~$ ssh-keygenGenerating public/private rsa key pair.Enter file in which to save the key (/home/ec2-user/.ssh/id_rsa):Enter passphrase (empty for no passphrase):Enter same passphrase again:Your identification has been saved in /home/ec2-user/.ssh/id_rsa.Your public key has been saved in /home/ec2-user/.ssh/id_rsa.pub.The key fingerprint is:SHA256:C/9NM8QUeFmufINb6BGW1Zeknn1SjqqhYUseQ45XVlQ ec2-user@ip-10-0-1-251The key's randomart image is:+---[RSA 2048]----+| .o+Eo.|| ..o=..o|| .*.. o|| *.=o+ || . S o Oo*.o|| * + o * o.|| . @ . B || = B = o || + o . |+----[SHA256]-----+// Create a new directory for OpenShift related files.ec2-user Sun Aug 11 2024 ip-10-0-1-251 ec2-user@ip-10-0-1-251 ~$ mkdir OCP4// Create install-config.yaml file, replace pullSecret & public sshKey.ec2-user Sun Aug 11 2024 ip-10-0-1-251 ec2-user@ip-10-0-1-251 ~$ vi OCP4/install-config.yamlapiVersion: v1baseDomain: ayush.comcompute:- hyperthreading: Enabled name: worker replicas: 0controlPlane: hyperthreading: Enabled name: master replicas: 3metadata: name: ocp-bm-upinetworking: clusterNetwork: - cidr: 10.128.0.0/14 hostPrefix: 23 networkType: OVNKubernetes serviceNetwork: - 172.30.0.0/16platform: none: {}fips: falsepullSecret: '{"auths": ...}'sshKey: 'ssh-rsa AAAAB3NzaC1yc...'// sshKey content can be found in ~/.ssh/id_rsa.pub file.ec2-user Sun Aug 11 2024 ip-10-0-1-251 ec2-user@ip-10-0-1-251 ~$ cat ~/.ssh/id_rsa.pubssh-rsa AAAAB3NzaC1yc2EAAAADAQxxxxxxxxxxx......// Generate the manifests from install-config.yaml file.ec2-user Sun Aug 11 2024 ip-10-0-1-251 ec2-user@ip-10-0-1-251 ~$ ./openshift-install create manifests --dir=OCP4INFO Consuming Install Config from target directoryWARNING Making control-plane schedulable by setting MastersSchedulable to true for Scheduler cluster settingsINFO Manifests created in: OCP4/manifests and OCP4/openshift// Generate the ignition-configs.ec2-user Sun Aug 11 2024 ip-10-0-1-251 ec2-user@ip-10-0-1-251 ~$ ./openshift-install create ignition-configs --dir=OCP4INFO Consuming Common Manifests from target directoryINFO Consuming Master Machines from target directoryINFO Consuming Openshift Manifests from target directoryINFO Consuming Worker Machines from target directoryINFO Consuming OpenShift Install (Manifests) from target directoryINFO Ignition-Configs created in: OCP4 and OCP4/auth// Three ignition files and credentials for OCP admin user in auth dir.ec2-user Sun Aug 11 2024 ip-10-0-1-251 ec2-user@ip-10-0-1-251 ~$ ls -l OCP4/total 292drwxr-x--- 2 ec2-user ec2-user 4096 Aug 10 19:08 auth-rw-r----- 1 ec2-user ec2-user 279389 Aug 10 19:08 bootstrap.ign-rw-r----- 1 ec2-user ec2-user 1722 Aug 10 19:08 master.ign-rw-r----- 1 ec2-user ec2-user 148 Aug 10 19:08 metadata.json-rw-r----- 1 ec2-user ec2-user 1722 Aug 10 19:08 worker.ign
- Use the AWS CLI to upload the bootstrap.ign file to the S3 bucket. Create a merge-bootstrap.ign file containing the S3 object URL of bootstrap.ign, base64 encoding its content. This is required as the bootstrap.ign contents are over the limit for the user-data that can be passed to an EC2 instance.
// Configure aws cli.ec2-user Sun Aug 11 2024 ip-10-0-1-251 ec2-user@ip-10-0-1-251 ~$ aws configureAWS Access Key ID [None]: AKI.......AWS Secret Access Key [None]: ZAp........Default region name [None]: us-east-1Default output format [None]:// Copy bootstrap.ign to the S3 bucket (created by CloudFormation).ec2-user Sun Aug 11 2024 ip-10-0-1-251 ec2-user@ip-10-0-1-251 ~$ aws s3 cp OCP4/bootstrap.ign s3://ayush-baremetal-upi --acl public-readupload: OCP4/bootstrap.ign to s3://ayush-baremetal-upi/bootstrap.ign
- Get the bootstrap.ign S3 object URL.

- Create merge-bootstrap.ign file which will contain the S3 object URL for bootstrap.ign and base64 encode the file content.
The base64 encoded content is masked in below code block considering the size of the content.
ec2-user Sun Aug 11 2024 ip-10-0-1-251 ec2-user@ip-10-0-1-251 ~$ vi OCP4/merge-bootstrap.ign{ "ignition": { "config": { "merge": [ { "source": "https://ayush-baremetal-upi.s3.amazonaws.com/bootstrap.ign", "verification": {} } ] }, "timeouts": {}, "version": "3.2.0" }, "networkd": {}, "passwd": {}, "storage": {}, "systemd": {}}ec2-user Sun Aug 11 2024 ip-10-0-1-251 ec2-user@ip-10-0-1-251 ~$ cat OCP4/merge-bootstrap.ign | base64 -w0ewogICJpZ25pdGlvbiI6IHsKICAgICJ......
- Use the Bootstrap-Instance.yaml file to create the bootstrap node stack. Input the required parameter values, along with the base64 encoded content and resource IDs from the previous steps.
The values for parameters RHCOS AMI ID, ResourcePrefix can be obtained from the Information Handy section, values for Security Group ID, Subnet ID should be copied from Outputs tab of AWS Infra CloudFormation Stack and the base64 encoded content from the previous step needs to be specified in UserData parameter.

- Once the stack creation is complete, register the bootstrap node with the target groups for ports 6443 and 22623 using its IP address.


- SSH into the bootstrap node, verify that the temporary control plane is up.
// SSH to bootstrap node.ec2-user Sun Aug 11 2024 ip-10-0-1-251 ec2-user@ip-10-0-1-251 ~$ ssh core@10.0.4.242The authenticity of host '10.0.4.242 (10.0.4.242)' can't be established.ECDSA key fingerprint is SHA256:KBdgfytm5c86lW3EcRtb8+hOnjGlDajGQDb1CQxY/Mg.ECDSA key fingerprint is MD5:96:ee:31:9f:1f:ed:b4:f0:bc:e0:fe:4a:d8:04:a3:b1.Are you sure you want to continue connecting (yes/no)? yesWarning: Permanently added '10.0.4.242' (ECDSA) to the list of known hosts.Red Hat Enterprise Linux CoreOS 416.94.202405291527-0 Part of OpenShift 4.16, RHCOS is a Kubernetes-native operating system managed by the Machine Config Operator (`clusteroperator/machine-config`).WARNING: Direct SSH access to machines is not recommended; instead,make configuration changes via `machineconfig` objects: https://docs.openshift.com/container-platform/4.16/architecture/architecture-rhcos.html---This is the bootstrap node; it will be destroyed when the master is fully up.The primary services are release-image.service followed by bootkube.service. To watch their status, run e.g. journalctl -b -f -u release-image.service -u bootkube.service[core@ip-10-0-4-242 ~]$// Check the bootkube service logs for temporary control plane.[core@ip-10-0-4-242 ~]$ journalctl -b -f -u release-image.service -u bootkube.service...Aug 10 20:00:20 ip-10-0-4-242 cluster-bootstrap[4568]: Starting temporary bootstrap control plane...Aug 10 20:00:20 ip-10-0-4-242 bootkube.sh[4524]: Starting temporary bootstrap control plane...Aug 10 20:00:20 ip-10-0-4-242 cluster-bootstrap[4568]: Waiting up to 20m0s for the Kubernetes APIAug 10 20:00:20 ip-10-0-4-242 bootkube.sh[4524]: Waiting up to 20m0s for the Kubernetes APIAug 10 20:00:21 ip-10-0-4-242 cluster-bootstrap[4568]: Still waiting for the Kubernetes API: Get "https://localhost:6443/readyz": dial tcp [::1]:6443: connect: connection refusedAug 10 20:00:21 ip-10-0-4-242 bootkube.sh[4524]: Still waiting for the Kubernetes API: Get "https://localhost:6443/readyz": dial tcp [::1]:6443: connect: connection refusedAug 10 20:00:38 ip-10-0-4-242 cluster-bootstrap[4568]: API is upAug 10 20:00:38 ip-10-0-4-242 bootkube.sh[4524]: API is up[core@ip-10-0-4-203 ~]$ exitlogoutConnection to 10.0.4.203 closed.
- Exit out of the bootstrap node after confirming the temporary control plane is up. Export the kubeconfig file and check the status of the cloud-credential operator. It can take a few minutes to become available.
ec2-user Sun Aug 11 2024 ip-10-0-1-251 ec2-user@ip-10-0-1-251 ~$ export KUBECONFIG=OCP4/auth/kubeconfigec2-user Sun Aug 11 2024 ip-10-0-1-251 ec2-user@ip-10-0-1-251 ~$ oc get co cloud-credentialNAME VERSION AVAILABLE PROGRESSING DEGRADED SINCE MESSAGEcloud-credential True False False 20m
- The bootstrap node will be showing healthy in both the target groups now.
Master Nodes Creation
- Base64 encode the master.ign file content. This encoded content will be used in the UserData parameter for the Master Nodes CloudFormation Stack.
The base64 encoded content is masked in below code block considering the size of the content.
ec2-user Sun Aug 11 2024 ip-10-0-1-251 ec2-user@ip-10-0-1-251 ~$ cat OCP4/master.ign | base64 -w0eyJpZ25pdGlvbiI6eyJjb25maWciOn.......
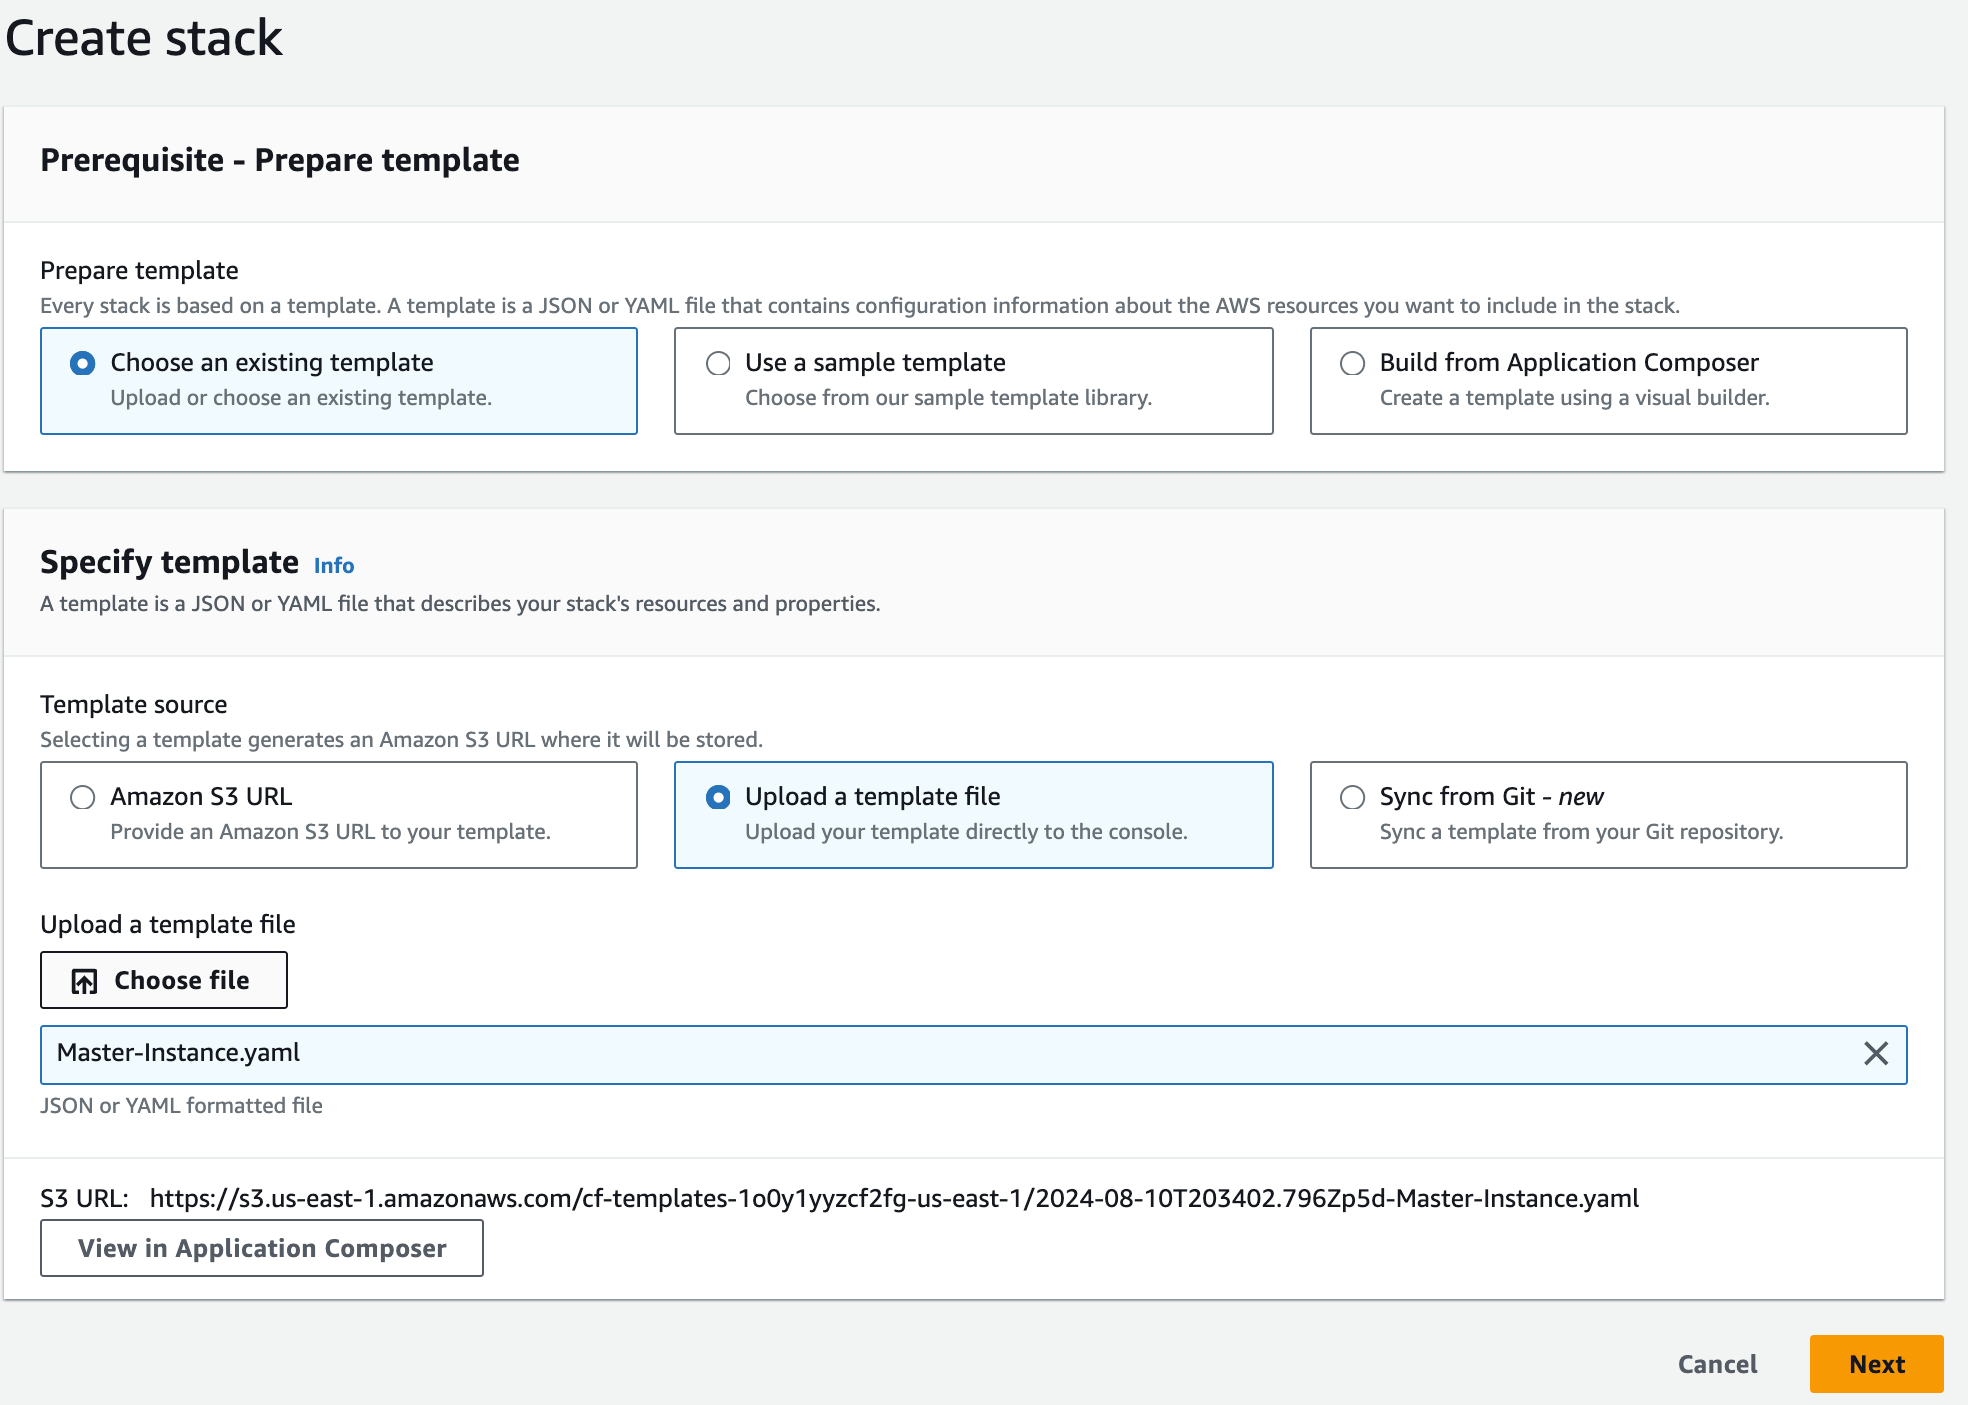
- Utilize the Master-Instance.yaml file to create the stack for the master nodes. Provide the necessary parameters, similar to the bootstrap node setup.

- After stack creation, register the IP addresses of all three master nodes with the appropriate target groups.


- Allow 20-25 minutes for the master nodes to become fully operational.
ec2-user Sun Aug 11 2024 ip-10-0-1-251 ec2-user@ip-10-0-1-251 ~$ oc get nodesNAME STATUS ROLES AGE VERSIONip-10-0-4-189 Ready control-plane,master 6m11s v1.29.6+aba1e8dip-10-0-5-27 Ready control-plane,master 6m11s v1.29.6+aba1e8dip-10-0-6-32 Ready control-plane,master 6m12s v1.29.6+aba1e8d
ec2-user Sun Aug 11 2024 ip-10-0-1-251 ec2-user@ip-10-0-1-251 ~$ oc get coNAME VERSION AVAILABLE PROGRESSING DEGRADED SINCE MESSAGEauthentication 4.16.5 False True False 13m WellKnownAvailable: The well-known endpoint is not yet available: kube-apiserver oauth endpoint https://10.0.6.32:6443/.well-known/oauth-authorization-server is not yet served and authentication operator keeps waiting (check kube-apiserver operator, and check that instances roll out successfully, which can take several minutes per instance)baremetal 4.16.5 True False False 12mcloud-controller-manager 4.16.5 True False False 15mcloud-credential 4.16.5 True False False 63mcluster-autoscaler 4.16.5 True False False 12mconfig-operator 4.16.5 True False False 13mconsole 4.16.5 False True True 2m8s DeploymentAvailable: 0 replicas available for console deployment...control-plane-machine-set 4.16.5 True False False 12mcsi-snapshot-controller 4.16.5 True False False 13mdns 4.16.5 True False False 12metcd 4.16.5 True True True 9m4s EtcdMembersDegraded: 2 of 3 members are available, ip-10-0-6-32 is unhealthy...image-registry 4.16.5 True False False 6m18singress 4.16.5 True False False 3m1sinsights 4.16.5 True False False 7m5skube-apiserver 4.16.5 False True True 13m StaticPodsAvailable: 0 nodes are active; 3 nodes are at revision 0; 0 nodes have achieved new revision 11kube-controller-manager 4.16.5 True True False 11m NodeInstallerProgressing: 2 nodes are at revision 3; 1 node is at revision 4; 0 nodes have achieved new revision 6kube-scheduler 4.16.5 True True False 10m NodeInstallerProgressing: 1 node is at revision 4; 2 nodes are at revision 5kube-storage-version-migrator 4.16.5 True False False 13mmachine-api 4.16.5 True False False 12mmachine-approver 4.16.5 True False False 13mmachine-config 4.16.5 True False False 12mmarketplace 4.16.5 True False False 12mmonitoring Unknown True Unknown 12m Rolling out the stack.network 4.16.5 True False False 13mnode-tuning 4.16.5 True False False 13mopenshift-apiserver 4.16.5 True True False 41s APIServerDeploymentProgressing: deployment/apiserver.openshift-apiserver: 1/3 pods have been updated to the latest generationopenshift-controller-manager 4.16.5 True False False 11mopenshift-samples 4.16.5 True False False 5m48soperator-lifecycle-manager 4.16.5 True False False 12moperator-lifecycle-manager-catalog 4.16.5 True False False 12moperator-lifecycle-manager-packageserver 4.16.5 True False False 101sservice-ca 4.16.5 True False False 13mstorage 4.16.5 True False False 13m
- During this time, SSH back into the bootstrap node and monitor the bootkube logs to confirm that the bootstrap process is complete.
[core@ip-10-0-4-242 ~]$ journalctl -b -f -u release-image.service -u bootkube.service...Aug 10 20:58:53 ip-10-0-4-242 bootkube.sh[9157]: Check if API URL is reachable during bootstrapAug 10 20:58:53 ip-10-0-4-242 bootkube.sh[9157]: Checking if api.ocp-bm-upi.ayush.com of type API_URL reachableAug 10 20:58:53 ip-10-0-4-242 bootkube.sh[9157]: Success while trying to reach API_URL's https endpoint at https://api.ocp-bm-upi.ayush.com:6443/versionAug 10 20:58:53 ip-10-0-4-242 bootkube.sh[9157]: Check if API-Int URL is reachable during bootstrapAug 10 20:58:53 ip-10-0-4-242 bootkube.sh[9157]: Checking if api-int.ocp-bm-upi.ayush.com of type API_INT_URL reachableAug 10 20:58:54 ip-10-0-4-242 bootkube.sh[9157]: Success while trying to reach API_INT_URL's https endpoint at https://api-int.ocp-bm-upi.ayush.com:6443/versionAug 10 20:58:54 ip-10-0-4-242 bootkube.sh[9157]: bootkube.service completeAug 10 20:58:54 ip-10-0-4-242 systemd[1]: bootkube.service: Deactivated successfully.Aug 10 20:58:54 ip-10-0-4-242 systemd[1]: bootkube.service: Consumed 4.941s CPU time.
- Once confirmed, deregister the bootstrap node from the target groups and delete the CloudFormation stack for the bootstrap node. The S3 bucket used for the bootstrap process can also be deleted.
- It typically takes 40-45 minutes for the cluster to become ready.
ec2-user Sun Aug 11 2024 ip-10-0-1-251 ec2-user@ip-10-0-1-251 ~$ oc get nodesNAME STATUS ROLES AGE VERSIONip-10-0-4-189 Ready control-plane,master,worker 25m v1.29.6+aba1e8dip-10-0-5-27 Ready control-plane,master,worker 25m v1.29.6+aba1e8dip-10-0-6-32 Ready control-plane,master,worker 25m v1.29.6+aba1e8dec2-user Sun Aug 11 2024 ip-10-0-1-251 ec2-user@ip-10-0-1-251 ~$ oc get coNAME VERSION AVAILABLE PROGRESSING DEGRADED SINCE MESSAGEauthentication 4.16.5 True False False 2m38sbaremetal 4.16.5 True False False 21mcloud-controller-manager 4.16.5 True False False 23mcloud-credential 4.16.5 True False False 72mcluster-autoscaler 4.16.5 True False False 21mconfig-operator 4.16.5 True False False 22mconsole 4.16.5 True False False 5m55scontrol-plane-machine-set 4.16.5 True False False 21mcsi-snapshot-controller 4.16.5 True False False 22mdns 4.16.5 True False False 21metcd 4.16.5 True False False 17m image-registry 4.16.5 True False False 15mingress 4.16.5 True False False 11minsights 4.16.5 True False False 15mkube-apiserver 4.16.5 True False False 5m26skube-controller-manager 4.16.5 True False False 19mkube-scheduler 4.16.5 True False False 19mkube-storage-version-migrator 4.16.5 True False False 22mmachine-api 4.16.5 True False False 21mmachine-approver 4.16.5 True False False 22mmachine-config 4.16.5 True False False 21mmarketplace 4.16.5 True False False 21mmonitoring 4.16.5 True False False 8m27snetwork 4.16.5 True False False 22mnode-tuning 4.16.5 True False False 21mopenshift-apiserver 4.16.5 True False False 9m28sopenshift-controller-manager 4.16.5 True False False 20mopenshift-samples 4.16.5 True False False 14moperator-lifecycle-manager 4.16.5 True False False 21moperator-lifecycle-manager-catalog 4.16.5 True False False 21moperator-lifecycle-manager-packageserver 4.16.5 True False False 10mservice-ca 4.16.5 True False False 22mstorage 4.16.5 True False False 22m
- All target groups should have healthy targets, except for ports 443 and 80, where one node will remain unhealthy considering only two replicas are there for the router by default.
ec2-user Sun Aug 11 2024 ip-10-0-1-251 ec2-user@ip-10-0-1-251 ~$ oc get pod -o wide -n openshift-ingressNAME READY STATUS RESTARTS AGE IP NODE NOMINATED NODE READINESS GATESrouter-default-6bfd8446b-dzgbd 1/1 Running 2 (21m ago) 27m 10.0.4.189 ip-10-0-4-189 <none> <none>router-default-6bfd8446b-f4fcb 1/1 Running 2 (21m ago) 27m 10.0.6.32 ip-10-0-6-32 <none> <none>
Worker Nodes Setup (Optional)
The worker nodes can be created similarly using the Worker-Instance.yaml file. Ensure that you manually approve the CSRs for worker nodes as per the official OpenShift documentation. This step is not covered in detail in this guide to keep the focus on the master node and bootstrap process.
Conclusion
Creating an OpenShift 4 BareMetal UPI cluster on AWS provides unparalleled control over your infrastructure, allowing you to customize every aspect of your deployment. By following the steps outlined in this guide, you can successfully set up and manage your OpenShift cluster, ensuring it meets your specific requirements.
Leave a Reply